
What is Snowflake Dynamic Data Masking ?

Amazing image by: Kelly Sikkema
This article describes Dynamic Data Masking in Snowflake and indicates the best practices to implement data masking policy. Using the techniques described you can deploy highly sensitive data, and yet rest assured that your data is protected and visible on need-to-know basis.
In addition explaining how to create a data masking policy, this article also demonstrates the simple but highly effective best practices to deploy data masking on potentially massive deployments with hundreds of roles and thousands of users.
Experience with Snowflake Data Masking shows many Snowflake Administrators get tied up in complexity and produce difficult to understand and hard to maintain solutions that closely tie data security with Role Based Access Control. The objective of this article is to produce a system that is “As simple as possible, and no simpler”.
What is Dynamic Data Masking?
Dynamic Data masking is a Snowflake security feature to selectively mask plain-text data in tables or views based upon a predefined masking policy. This can be used, for example to mask (or hide) sensitive data and ensure columns which contain sensitive data are only available on a need to know/need to use basis.
Take for example a system which records data about Products, Customers and Sale records. This may include a range of data values including:
Personally Identifying Data (PII). For example, a customer date of birth or home address subject to GDPR Regulations which protect the use of PII.
Commercially Sensitive Data. For example, the current and historical product price lists or profit margins.
Financially Sensitive Data. For example, the quarterly sales revenue and profit and loss values subject to financial compliance regulations.
Internal Data. For example the names of products on sale. This is often a default classification for data accessible to all employees.
Using the above example we may decide that only a limited number of people have need to know access to Personally Identifying data while only senior managers need access to commercially or Financially sensitive data while most of the remaining data will be classified as internal use. Based upon this categorisation and the business roles, we may decide to dynamically mask data unless people need to see the data in plain text.
Data Classification and Business Roles
A common mistake made by solution architects (and almost every other article on data masking) is to immediately dive into the technology details of Masking Policies and Role Hierarchies. This is a fundamental mistake.
Consider instead, the key points of the previous paragraph:
Data Classification: Including PII, Commercially Sensitive and Internal. This determines which data should be masked.
Business Roles: Including, System Administrators, Marketing Managers and Finance Analysts. This determines who should see the data at all.
Remember, that often over 99% of data is not sensitive, and yet I often see architects get so tied up in knots about the solution, they ignore the inherent simplicity of the problem. The need to understand how the data is classified, how users are grouped according to access needs, and then implement the links between the two. This leads to two important Best Practices:
Classify the Data: You don’t need to classify every data item and decide who needs access on a table-by-table or even a column-by-column basis. This is a painful and error prone approach. Simply classify the data into (a maximum of about five) categories. You may find dependencies, for example, Customer Credit Card could be classified as both Personally Identifying and Financially Sensitive data, but ignore these relationships for the moment.
Design the RBAC Solution: Don’t confuse data secrecy (masking - the 1% of the data) with data access (99% of the problem). Having agreed upon a data classification approach, ignore this, and design an RBAC Architecture to control who needs access to which data.
RBAC Architecture
Role Based Access Control (RBAC) is a challenging subject in itself. I have discussed RBAC before in a sequence of articles starting with An Introduction to RBAC. The diagram below illustrates a common RBAC architecture.

In the above diagram, three groups of users have access to the same SALES data. To simplify data access, they share a common set of Security Roles which determine their data access.
However, when we consider data secrecy we find additional requirements including:
Finance Analysts: With the PROD_FINANCE_ROLE need access including both Financial and Commercially Sensitive data, but not Personally Identifying Data.
Marketing Analysts: With the PROD_MARKETING_ANALYST role need access to Commercially Sensitive data but not Financially Sensitive data.
Engineering Support: Who have full access to create, modify or alter tables, but need no access to sensitive data at all.
Ideally, we need a simple, easily understood data classification solution that builds upon the RBAC architecture illustrated above. The diagram below illustrates how this can be achieved by adding additional roles to indicate access to sensitive data.
Data Classification Architecture
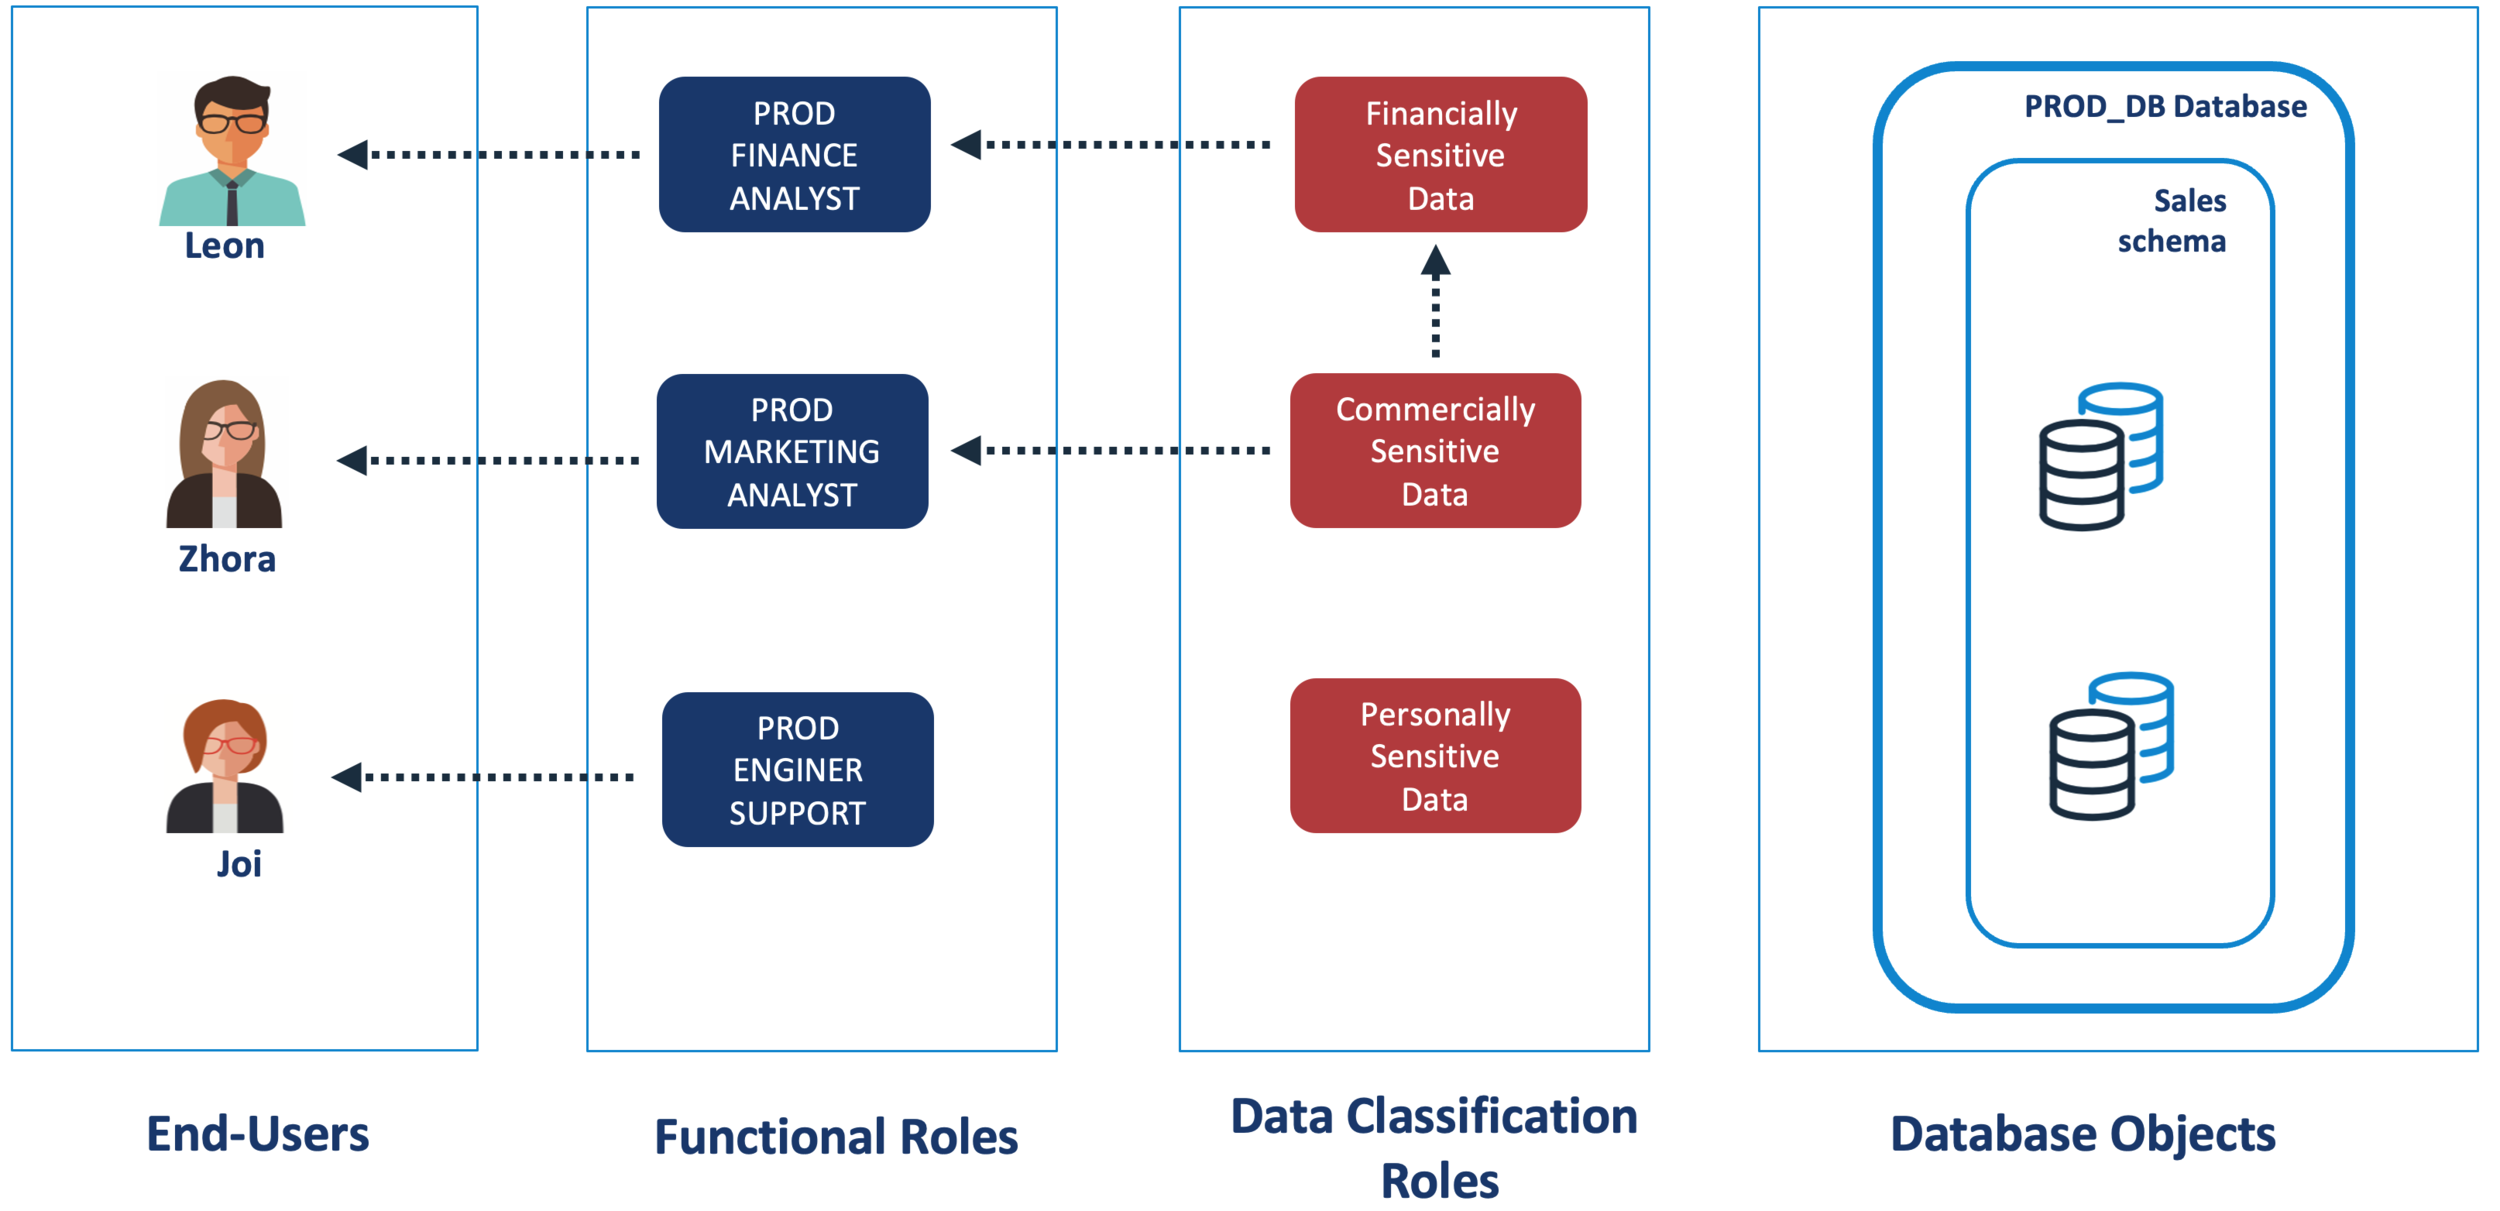
The above diagram illustrates a simple but flexible way to implement access control on potentially sensitive data. There are a few points worth noting in this design:
Table Independence: Notice that unlike the RBAC Architecture diagram above, there are no grants from tables or views to the data classification roles. Using Snowflake dynamic data masking we can add or remove masking on individual columns as needed. Unlike the Security Roles in the diagram above, there is no need to grant access to these Data Classification roles.
Classification Hierarchies: As all users with access to Financially sensitive data also need plain text access to Commercially sensitive data, we can implement a simple hierarchy by granting one role to the other. This means any business roles granted one role automatically inherit the other.
Business Functional Roles: Indicate the task undertaken by users and are therefore granted a combination of the Security Roles (which determine which data is accessible), and Data Classification roles which control sensitive data visibility.
Personally Sensitive Data Access: Is optional in this example. In the above diagram the PROD_ENGINEERING_SUPPORT role has no access to sensitive data, and in this example, there are no users with access to Personally Identifying sensitive data.
Note: In the diagram above and below, the Security Roles have been omitted to keep the diagram simple. We still need these roles in place to provide access to the underlying data.
Potential Challenge: Functional Role Explosion

The diagram above illustrates a potential problem with the Data Classification solution. In this example, not every Finance or Marketing Analyst is allowed access to sensitive data. This leads to an explosion of functional roles, whereby every Functional Role is duplicated to produce access to either sensitive or non-sensitive data.
This is not ideal as it unnecessarily adds additional roles and therefore system complexity as every functional role must be correctly granted access to the underlying Data Security roles. There’s a risk (for example), that PROD_MARKETING users would be granted slightly different access to PROD_MARKETING_SENSITIVE which will cause confusion and frustration.
The diagram below illustrates an elegant and more flexible solution to this problem.
The Solution to Role Explosion
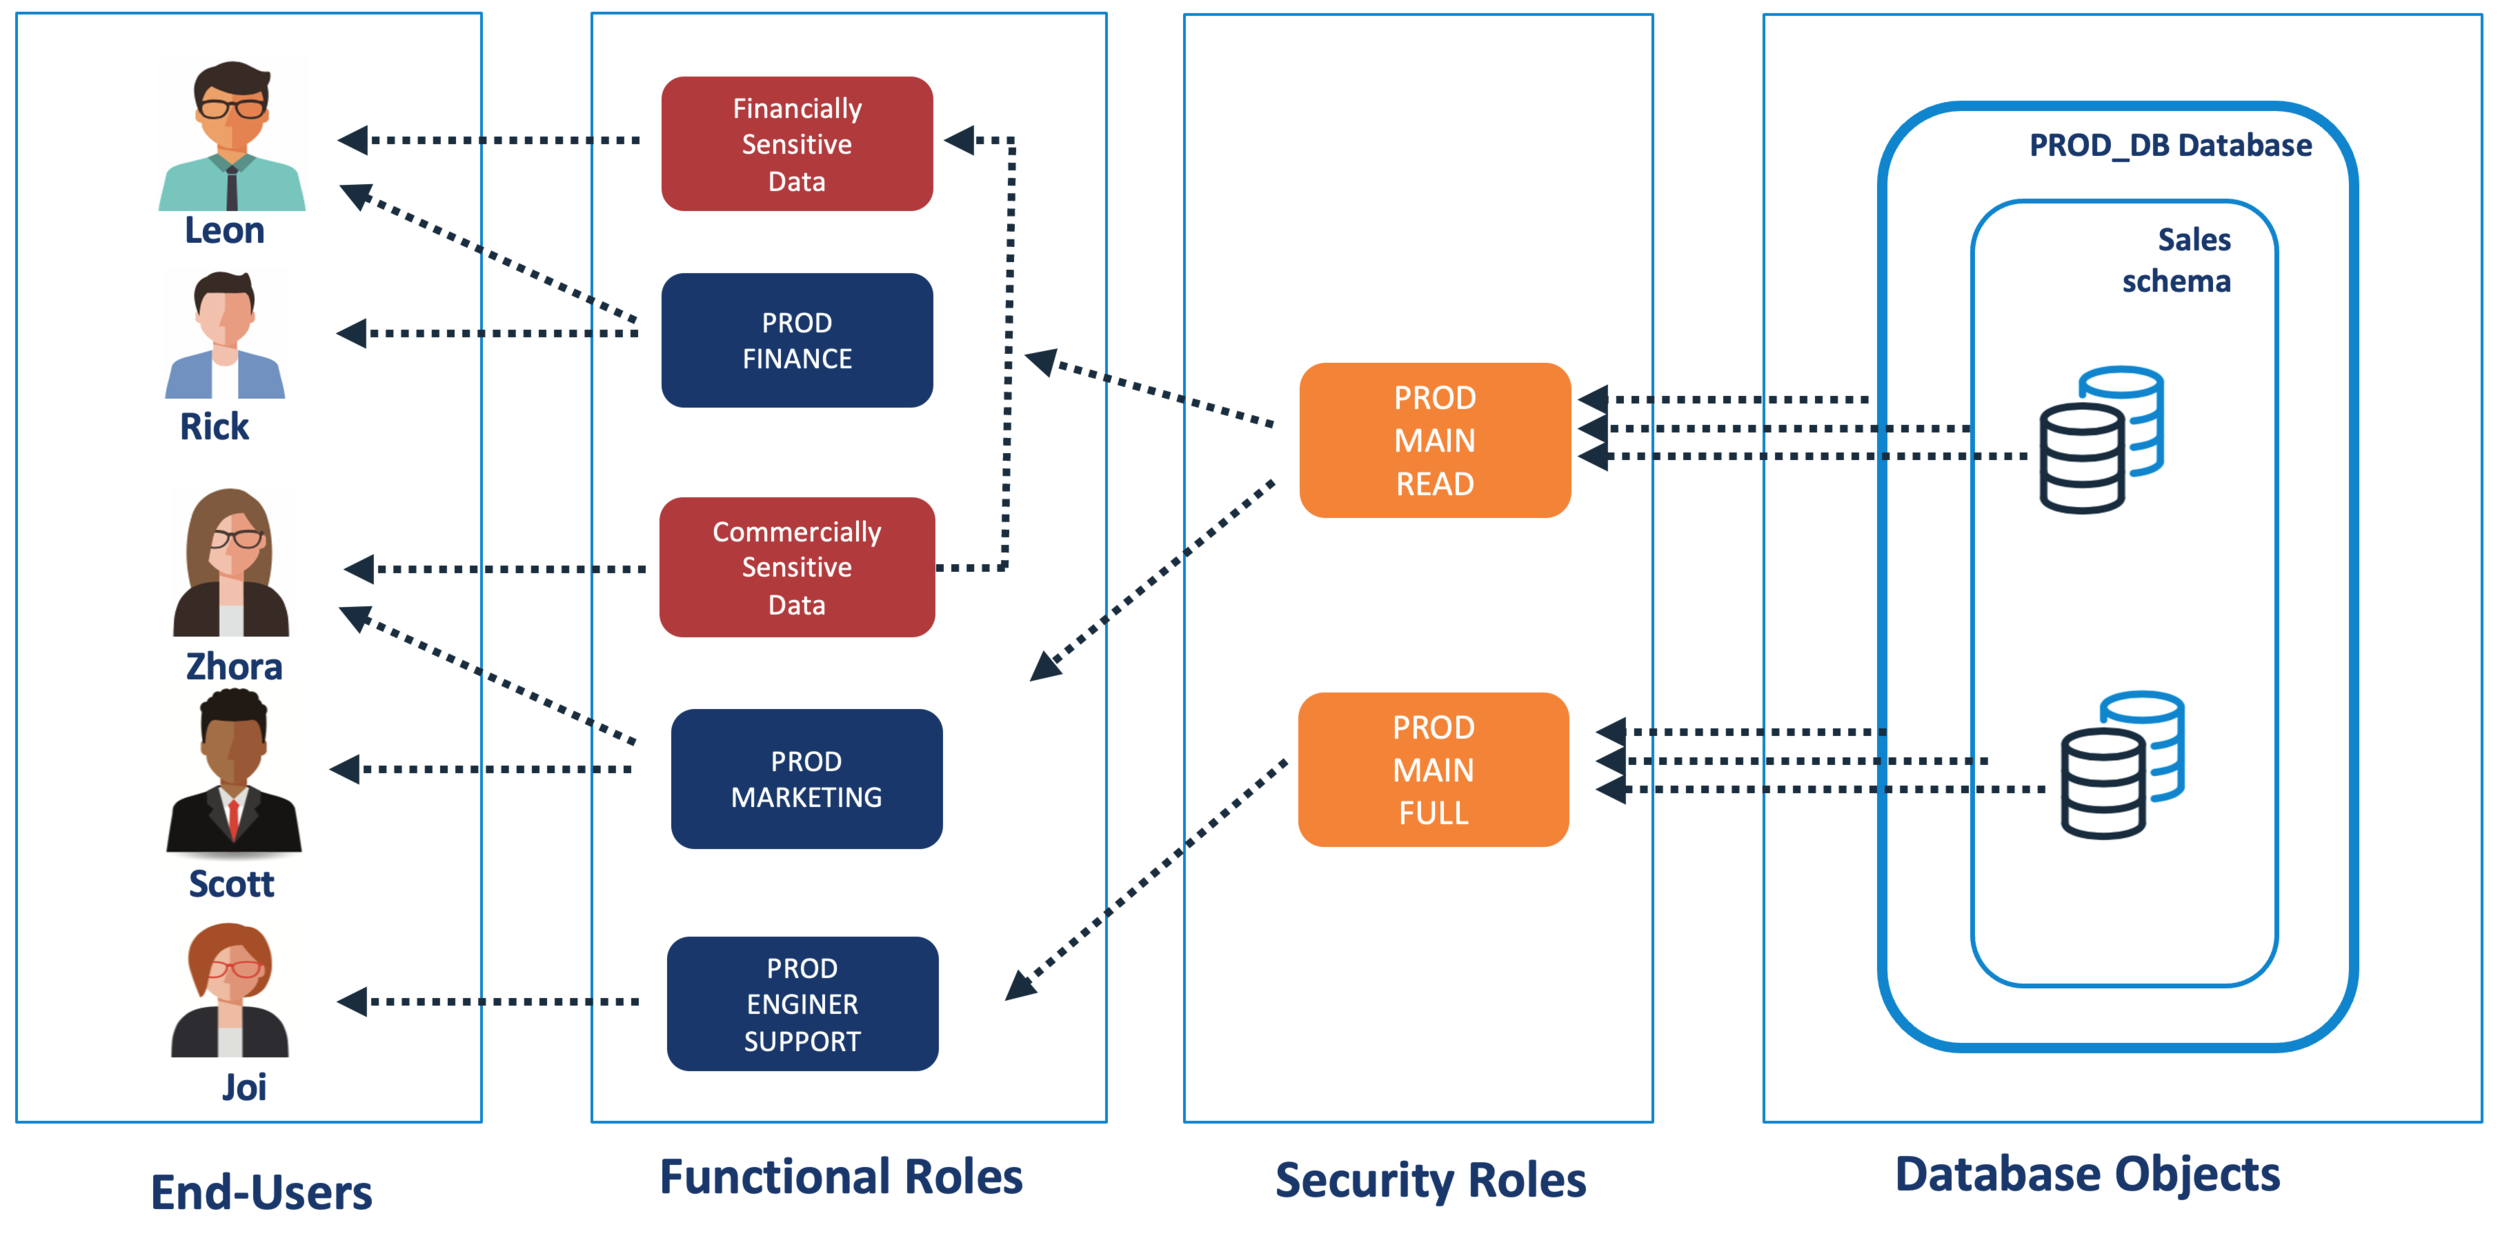
The diagram above illustrates a potential solution. Effectively, the Functional Role (eg. PROD_FINANCE) gives READ access to the underlying tables, and the Data Classification Role (eg. Financially Sensitive Data) grants additional access - in this case it allows the user to view the columns marked as Financially Sensitive in plain text.
This means (for example), that although both LEON and RICK can view the exact same data, only LEON can see the columns marked as Financially Sensitive in plain text. RICK can also see there is data there, but the data is automatically masked at execution time.
Implementing Dynamic Data Masking
As indicated above, the key to maintaining simplicity is the Data Classification. Effectively we need decide which data is potentially sensitive and classify it accordingly. In the above example, we classified the data as either Commercially or Financially sensitive.
Having identified and tagged the sensitive data, the Snowflake Administrator can then deploy a data masking policy. For example:
-- Role gives access to Financially sensitive data
create or replace role FINANCIALLY_SENSITIVE_DATA;

-- The Policy Masks Financially sensitive numeric values
create or replace masking policy FINANCIALLY_SENSITIVE_NUMBER as
(val    number) return number
case when contains(current_available_roles(),'FINANCIAL_SENSITIVE_DATA')
   then val
   else null
end;

-- Mask Financially sensitive string values
create or replace masking policy FINANCIALLY_SENSITIVE_STRING as
(val    string) return string
case when contains(current_available_roles(),'FINANCIAL_SENSITIVE_DATA')
   then val
   else repeat('*', length(val)) -- Replace strings with a sequence of *******
end;
The Masking Policy statements above check whether the user has inherited access to the FINANCIALLY_SENSITIVE_DATA role. If not, the values are returned as either NULL or replaced by asterisks. Once deployed, even users with OWNERSHIP privilege on the table cannot view the data in plain text without this role.
The flexibility in the above solution comes from the fact it does not pin the user down to a single CURRENT_ROLE() to define both data access and data classification.
The CURRENT_AVAILABLE_ROLES() function returns a JSON list of all the roles granted to the current user, and provided the user inherits or has been directly granted access to the FINANCALLY_SENSITIVE_DATA role, they can view the data in plain text.
Equally, the user must also be granted access to the underlying data with their primary Functional Role.
The solution also allows each user to be granted access to multiple Data Classification roles which makes it remarkably powerful for such a simple solution. Once all the necessary masking policies are defined, the SQL below shows an example of how to mark data as potentially masked.
alter table if exists SALES_PROFIT
   modify column TOTAL_SALES
   set masking policy FINANCIALLY_SENSITIVE_NUMBER;

alter table if exists PRODUCTS
   modify column PRODUCT_NAME
   set masking policy FINANCIALLY_SENSITIVE_STRING;
Notice the mask FINANCIALLY_SENSITIVE_STRING uses the Snowflake replace function to replace a varying length character string with asterisks. Alternatively we could write a User Defined Function or use a regular expression function to replace parts of the string. The screen shot below shows an example of a query against data which includes dynamic data masking.
Equally, the solution means we can define a single masking policy, but apply it to an unlimited number of columns. This means (for example) we can mask data items across multiple environments including PROD, Test and Development. Finally, as data is cloned or replicated, the masking policies are also cloned promoting automatic consistent data governance across the account.

Conclusion
Snowflake Dynamic Data Masking is a simple but powerful data governance feature which can be used to automatically mask sensitive data items. It can however be implemented in many sophisticated and over-complex ways which make it hard to understand and difficult to verify.
The key steps in deploying a data masking strategy are:
Classify the Data Types: Select a maximum of around five sensitive data classifications which could include Personally Identifying data, Financially Sensitive or even Departmentally Sensitive - for example, data only visible to Human Resources (HR) personnel.
Identify Business Roles and deploy RBAC: Having classified the data, set them aside and devise a sensible Role Based Access Architecture independent of handling sensitive data. Be sure to consider the RBAC Best Practices and perhaps the Introduction to Role-Based Access Control.
Implement Dynamic Data Masking: Use the Data Classifications from step 1 to define the masking policies needed, and decide whether it’s sensible to grant the roles directly to users (for maximum flexibility) or to existing functional roles. Note: Avoid splitting roles into sensitive and non-sensitive data access as this can lead to an explosion of roles. This requirement is better implemented by granting access to the Data Classification roles directly to users.
The important takeaway here, is to separate the problem of Data Access (the RBAC challenge of determining who needs access to tables) from Data Masking (whether specific columns need additional security using Automatic Data Masking).
Using the simple but powerful CURRENT_AVAILABLE_ROLES() function means we can treat these two problems as separate challenges and deliver a simple solution.
“Everything should be as Simple as Possible and no simpler”
Found this useful? Enter your eMail below to be notified when new articles are published.

John A. Ryan
Disclaimer: The opinions expressed on this site are entirely my own, and will not necessarily reflect those of my employer.