
Snowflake Zero Copy Clones and Data Storage

Photo by Mitchell Griest on Unsplash
The ability of Snowflake to create a Clone Table and produce a full read/write clone copy of terabytes of data within seconds is hugely powerful. Still, it can lead to an unexpected explosion of data storage. This article explains why creating Snowflake clone tables can lead to huge wasted data storage and how to identify and resolve the problem.
How does Snowflake Physically Store Data?
Unlike almost every other database which stores and updates data in place on disk storage, Snowflake stores data in Micro-Partitions which are large blocks of data, each around 16MB in size. Micro-Partitions are immutable in that once written they cannot be modified. Snowflake writes each micro-partition in sequence, and each entry is given an initial version number.

The diagram above illustrates the situation whereby entries are inserted into a SALES table, and once Snowflake decides the first micro-partition is large enough, it starts a new entry and continues to insert rows.
In reality, each Micro-Partition consists of two components, a tiny amount of metadata which is stored in the Snowflake Cloud Services layer, and the physical data storage which is held on cloud storage, for example, Amazon S3 or Google cloud storage.
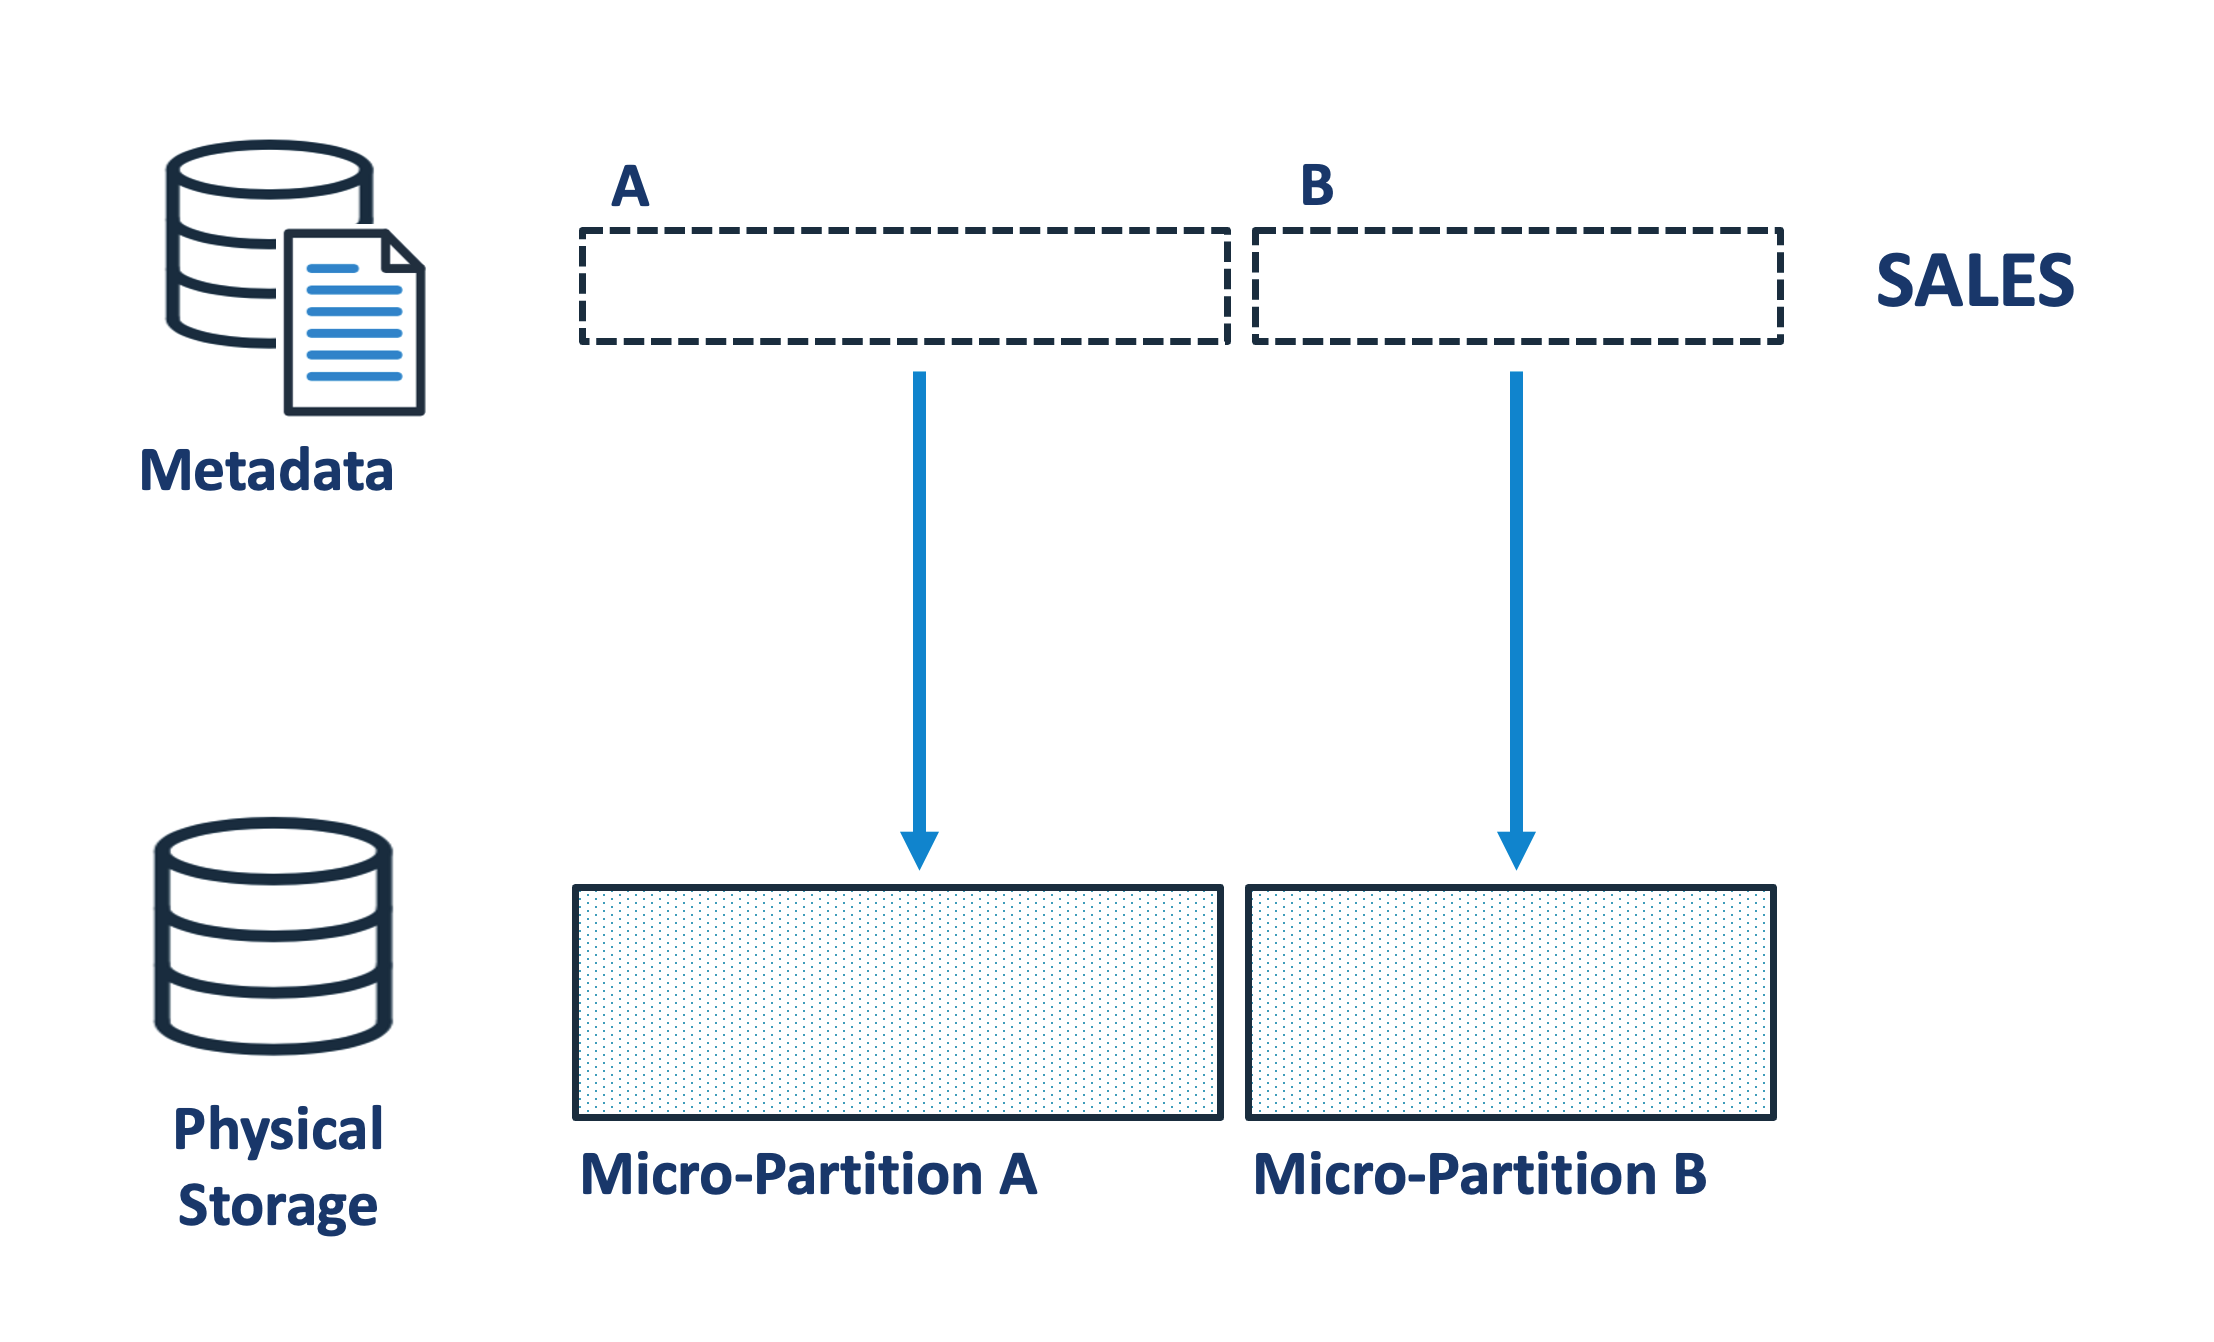
The diagram above illustrates how the data is physically stored, with the metadata for the SALES table in the Snowflake cloud services layer, and the physical micro-partitions held separately on S3 disk storage. It's worth noting, that the metadata is tiny when compared to the physical storage, perhaps a few hundred bytes and a pointer to the 16 MB of physical data. This is important because it helps explain why cloning is so incredibly fast.
How does Snowflake clone tables so fast?
The diagram below illustrates how Snowflake is able to clone terabytes of data within seconds. Unlike other data replication solutions, Snowflake doesn't actually copy any physical data, but merely copies the tiny metadata pointers to the new table. This means you can literally clone terabytes of data within seconds without incurring compute or indeed storage cost. The entire operation has zero cost, hence the name - Zero Copy Clone.
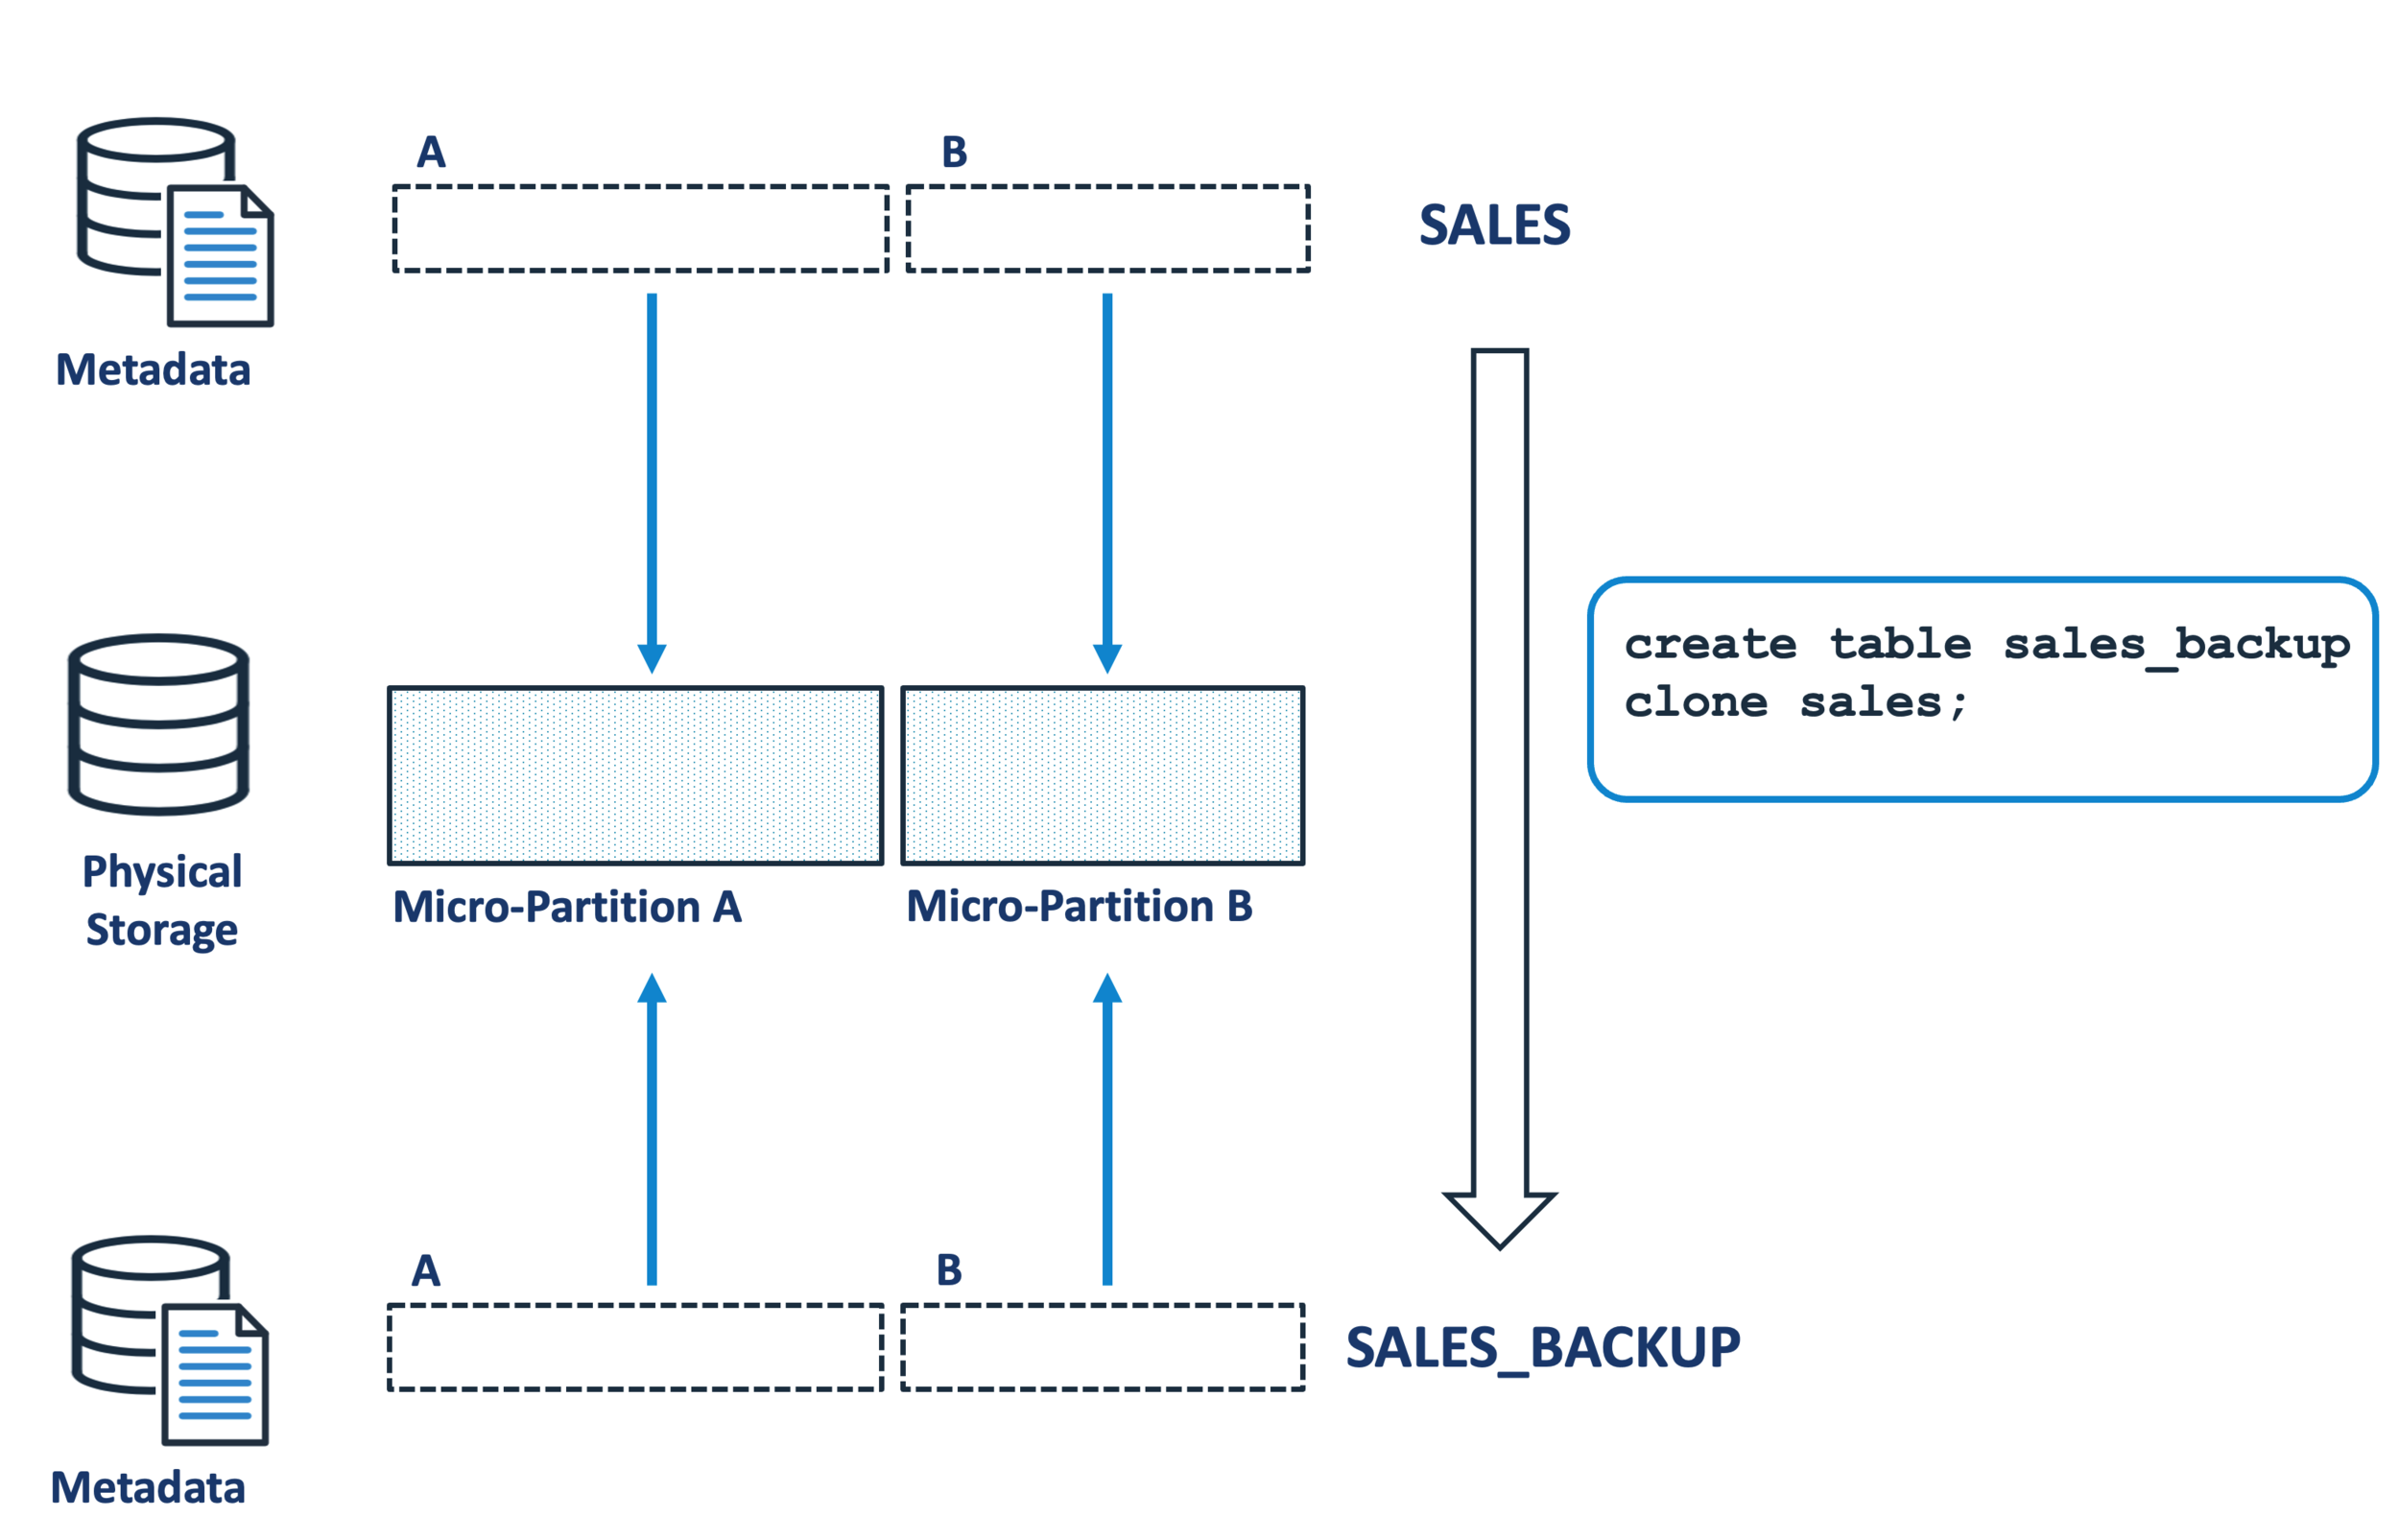
In the example above the SALES table is cloned to produce a SALES_BACKUP table. Tests have demonstrated we can clone a table with over a terabyte of storage in under 10 seconds, and the clone copy is a completely independent table which can receive inserts, updates, deletes or even be dropped without any impact upon the original table.
How does Snowflake handle updates?
As indicated above, once written Snowflake Micro-Partitions are immutable and cannot be modified. This means, when a user executes an UPDATE operation, instead of finding and updating the data in place, Snowflake simply creates a new version of the relevant micro-partitions with the changed data.
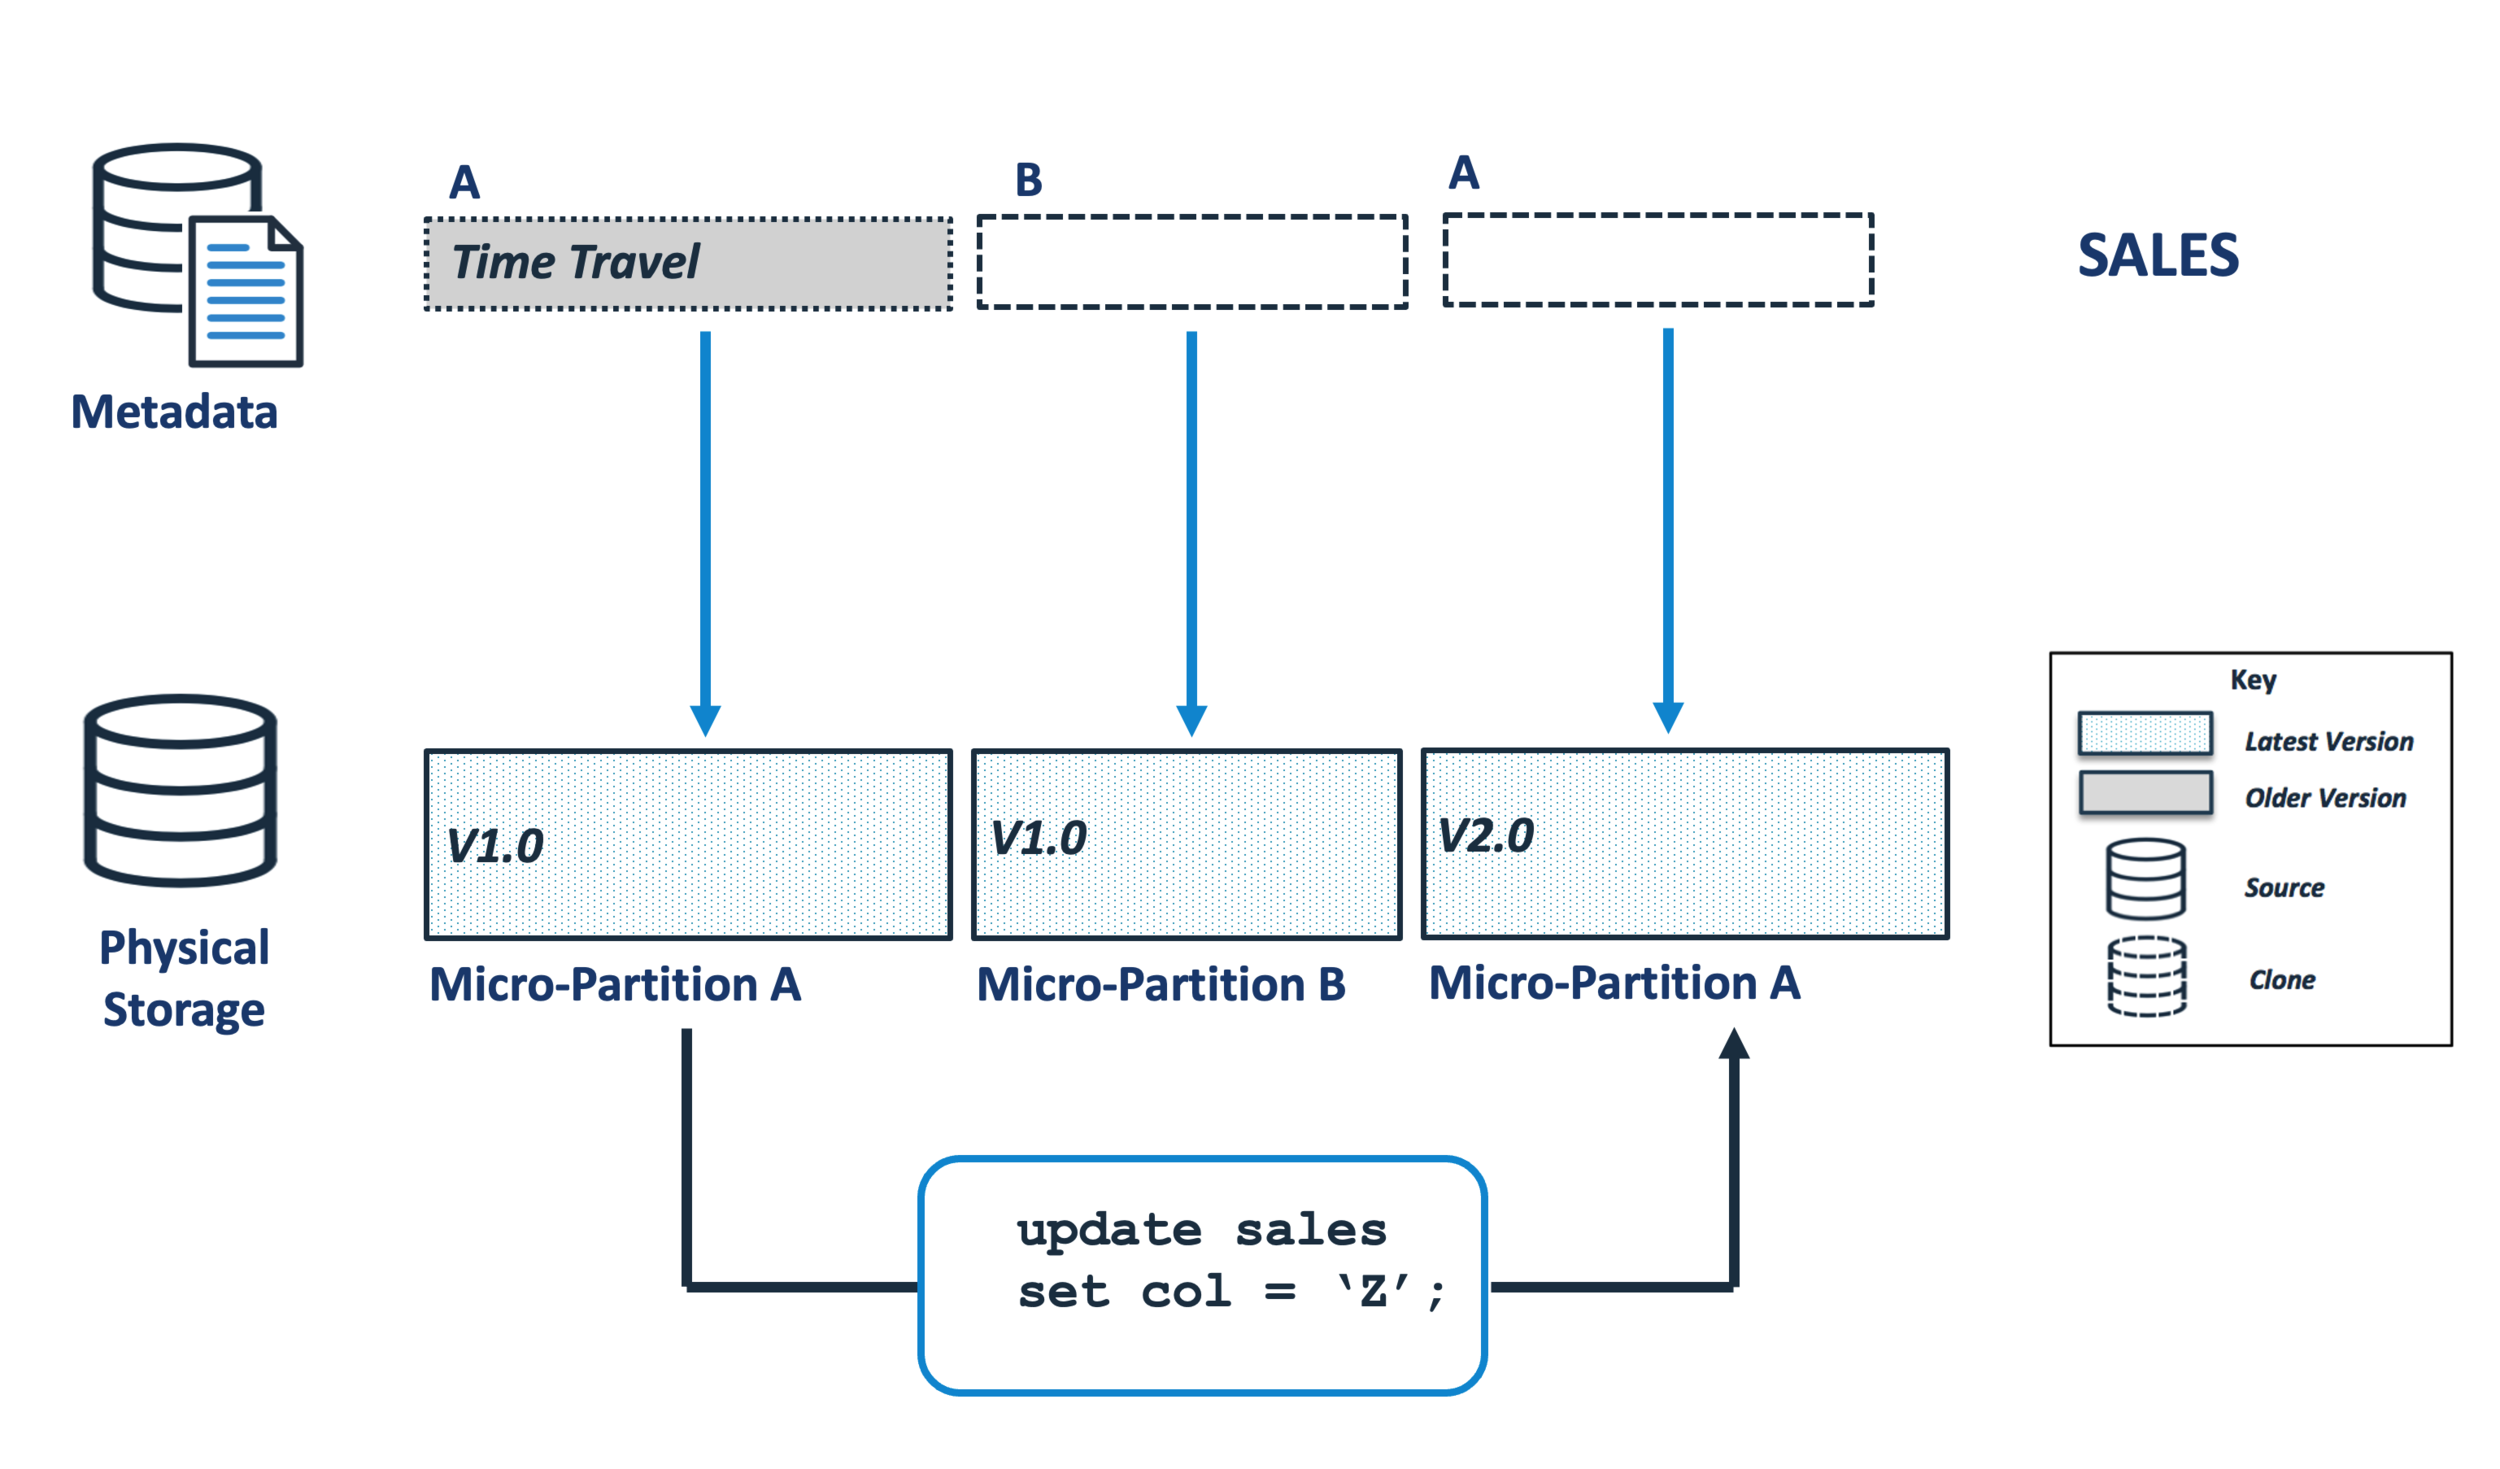
The diagram above illustrates how this is handled, with an update which affects micro-partition A resulting in a version 2.0 entry. Notice how the original micro-partition is not physically removed, but the corresponding metadata entry in the SALES table is marked as deleted and placed in Time Travel. This makes updates to the SALES table completely independent of the clone copy, the SALES_BACKUP.
This is a very powerful feature which allows us to recover from mistakes. For example, it means we can DROP the SALES table and have up to 90 days to UNDROP it.
The amount of time the data remains in time travel can be set for each table at between zero and 90 days after which the data is no longer available for queries.
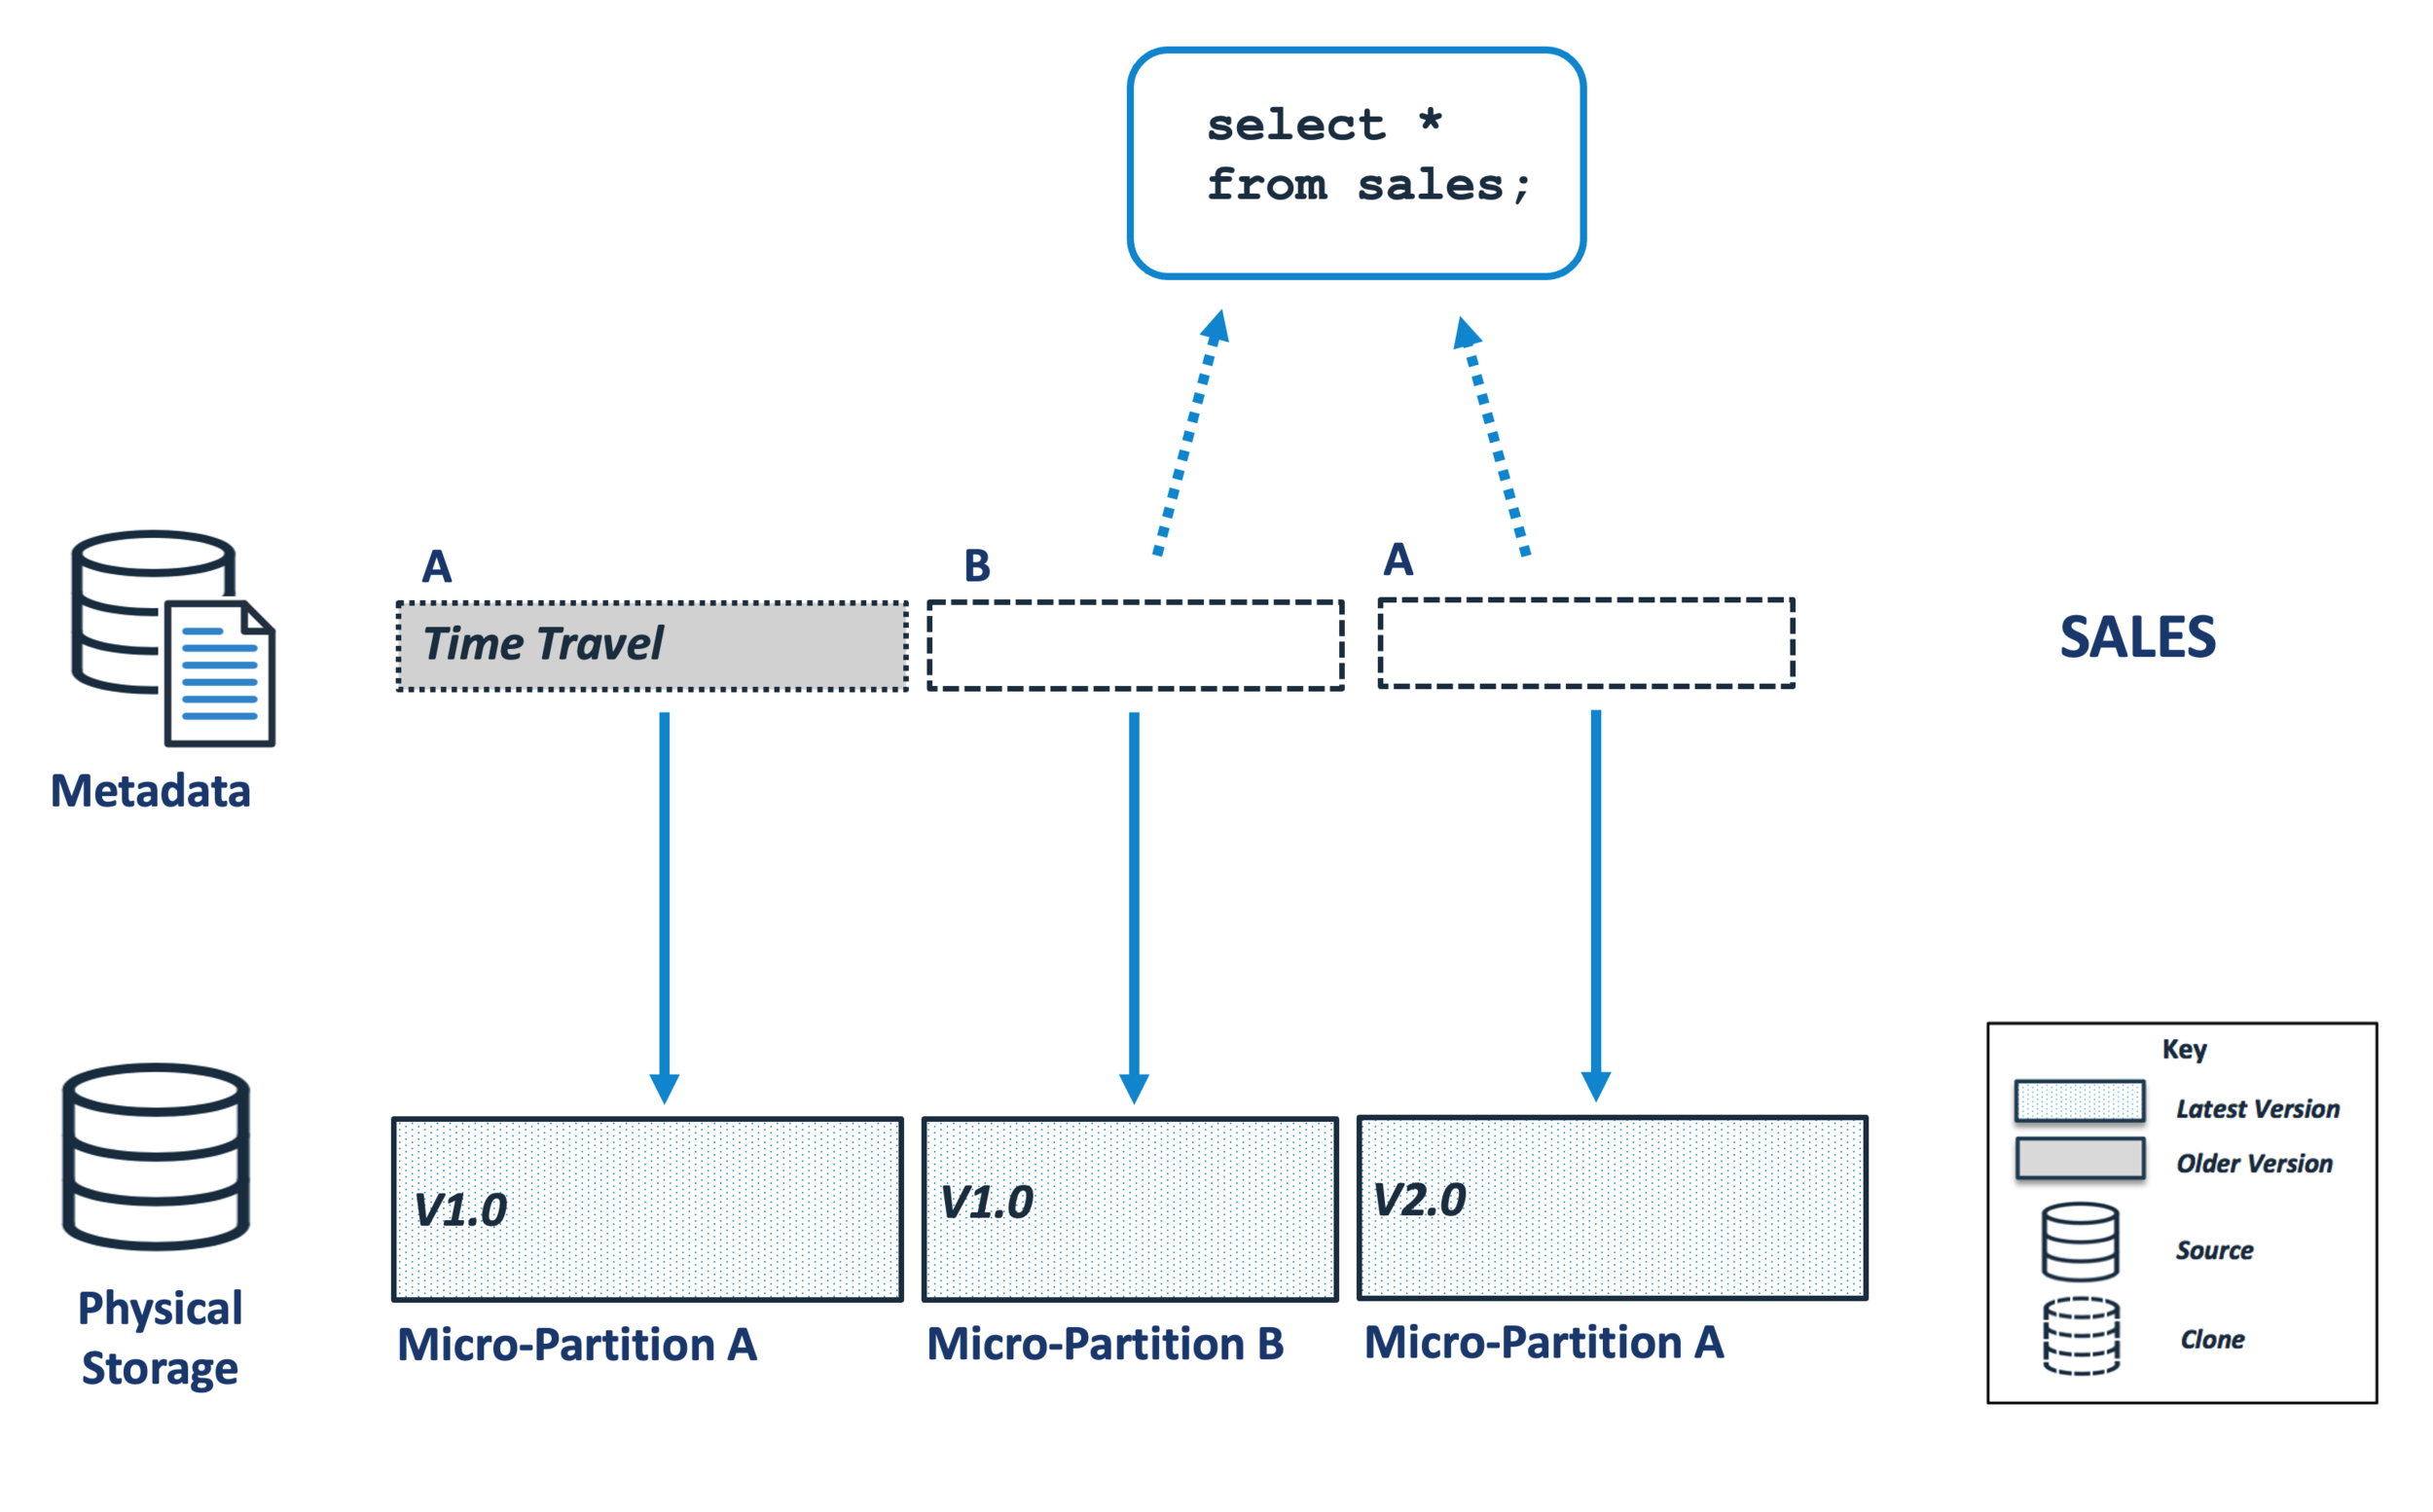
The diagram below illustrates how by default Snowflake ignores entries in time travel, and a query which SELECTs the results from the SALES table simply returns the current version. It is however possible to query the entries before the update was applied.
Managing a Snowflake Clone Table
While the ability to recover dropped tables or query the data as it was up to 90 days ago is very powerful, it can lead to a potential storage problem whereby data marked for Time Travel cannot be physically removed if a clone references the micro-partitions.
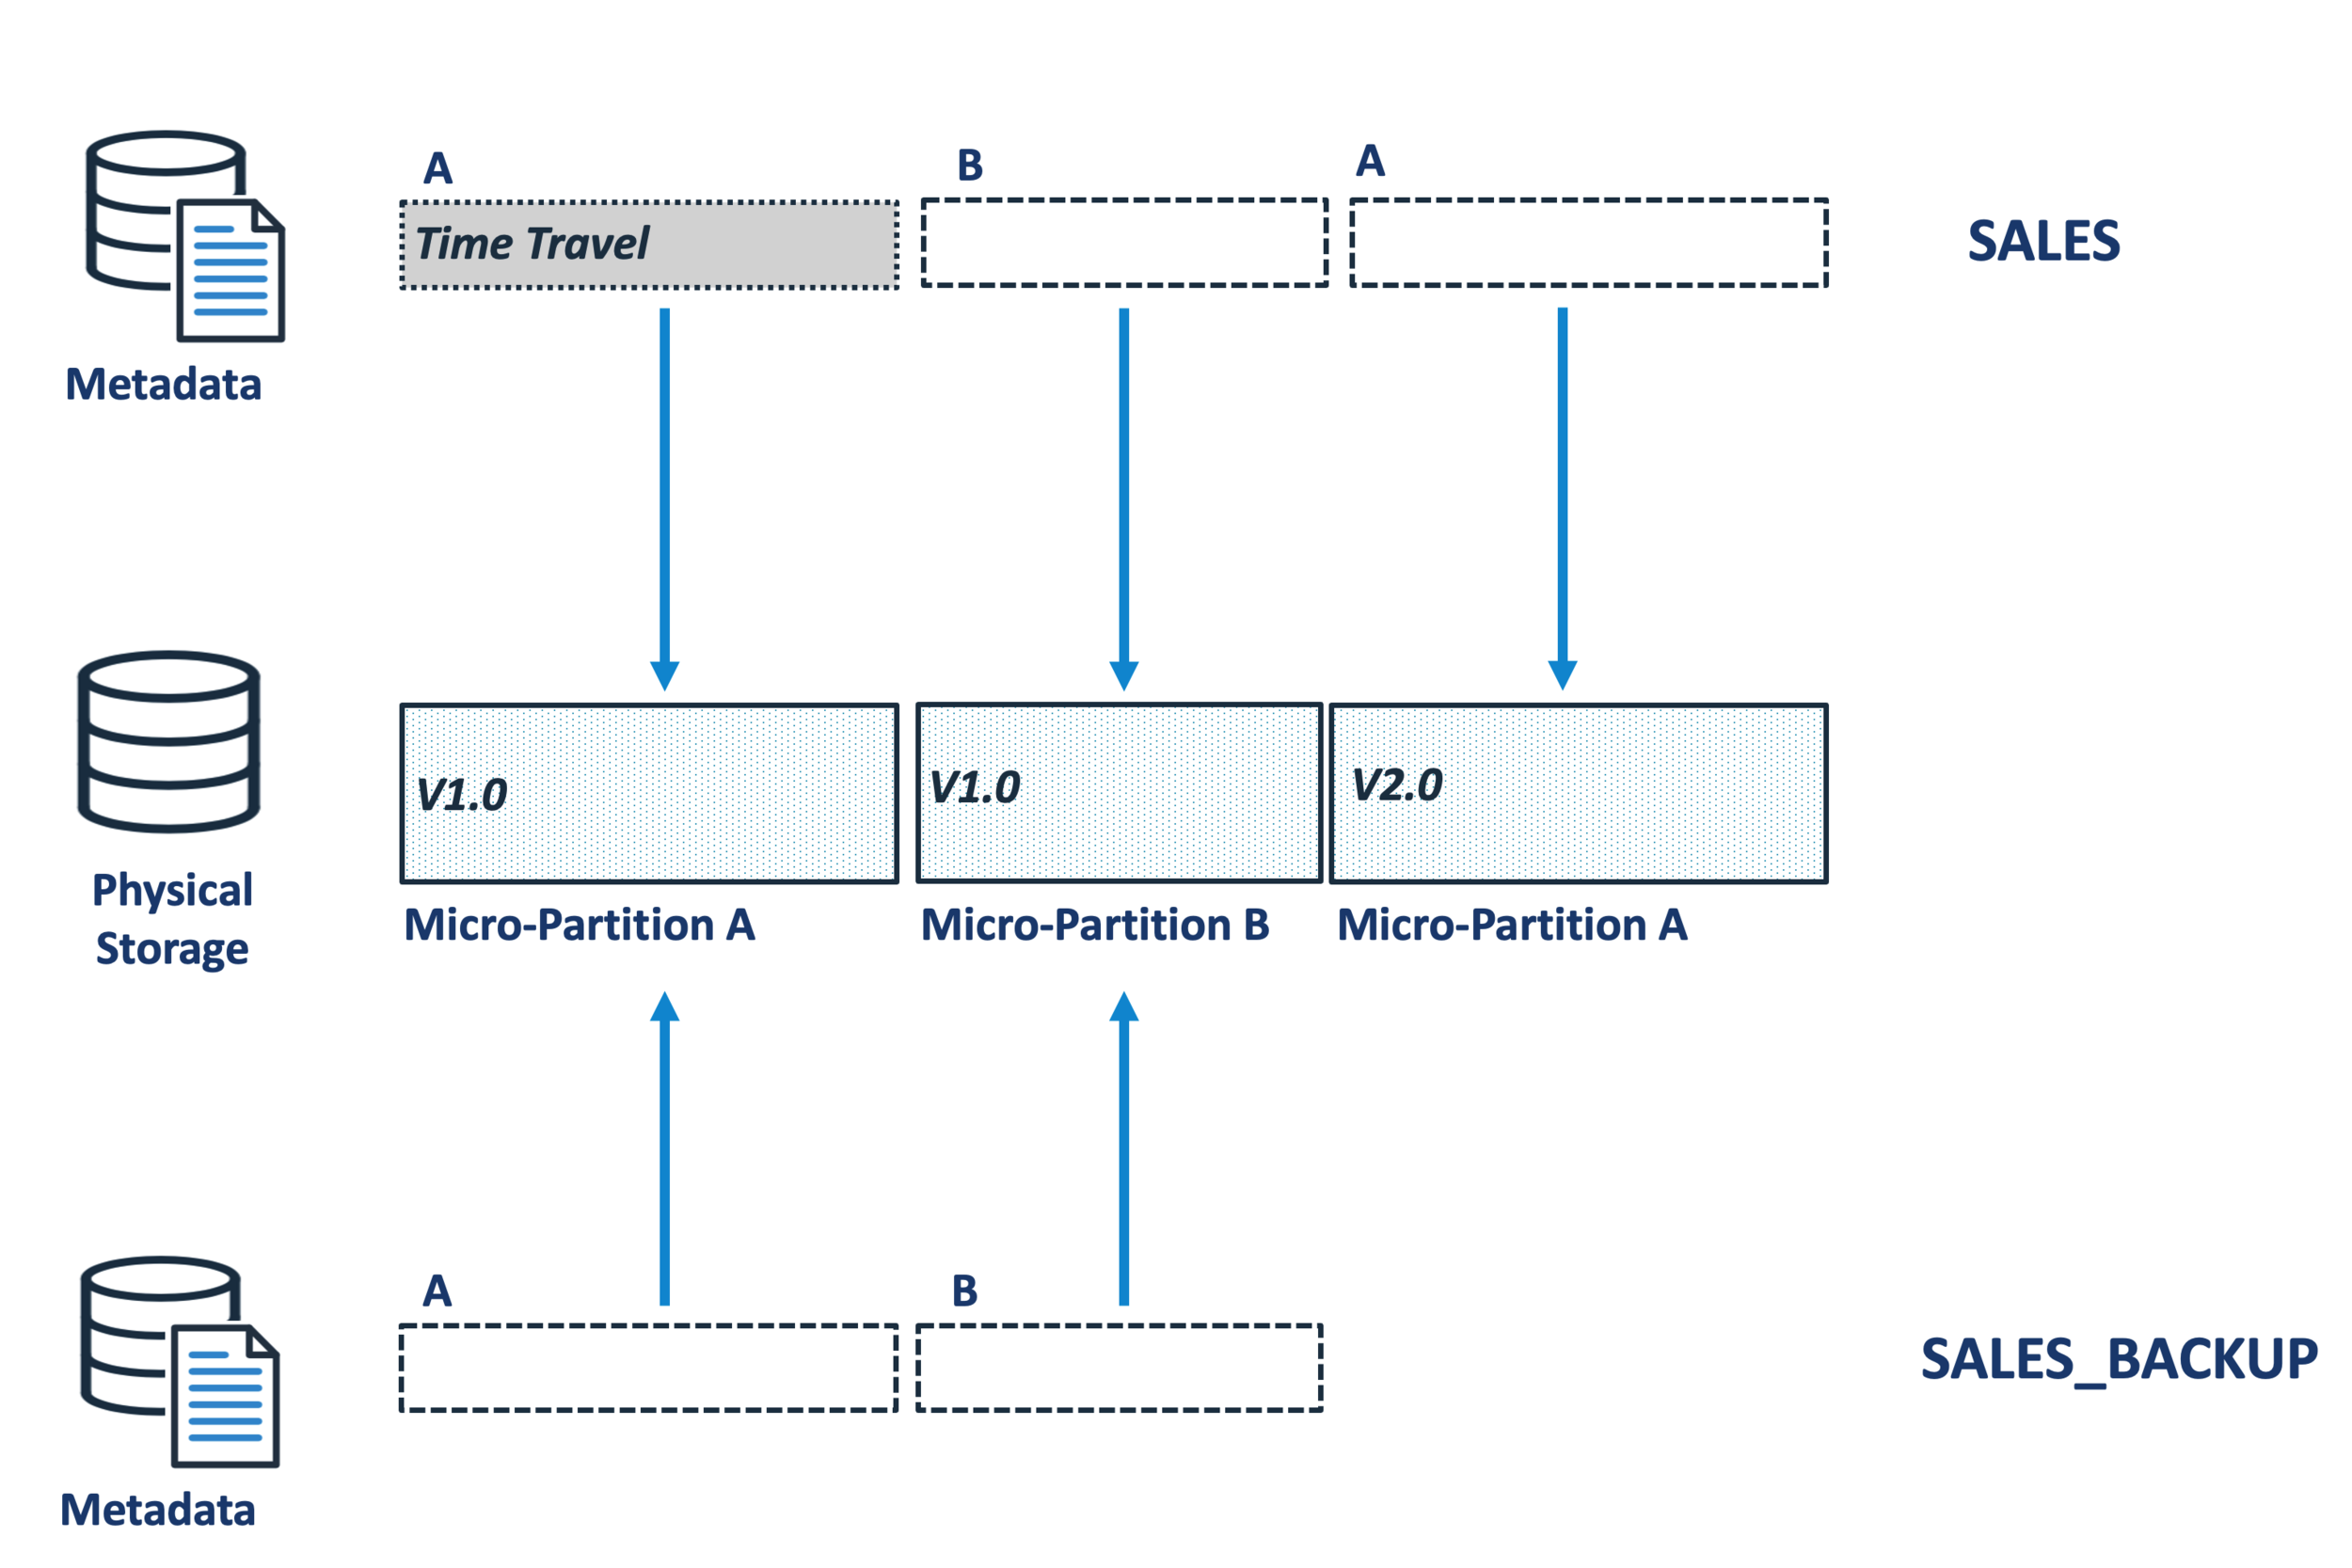
The diagram above illustrates a scenario whereby micro-partition A version 1.0 is permanently retained because it's referenced by the SALES_BACKUP table. On large systems with thousands of tables, and multiple clones of PROD to DEV and TEST environments this can lead to massive data redundancy with terabytes of storage being held.
Over time, as more rows in the SALES table are changed, the prior micro-partition versions are added to time travel, and the diagram below illustrates the situation immediately after the SALES table is dropped.

While micro-partition A version 2.0 will eventually be aged out of time-travel and physically removed, the other two entries will be held as long as the SALES_BACKUP table exists.
How to Identify Redundant Clones
Whenever a table is cloned, Snowflake keeps a record in an audit table, TABLE_STORAGE_METRICS. The following SQL can be used to identify both when each table was cloned, how much storage is being retained and how long ago the clone was made. This makes it easy to (for example), identify all clones taken over 6 months ago, retaining significant data volumes and therefore candidates for removal.
select  m1.table_catalog                as "Source Database"
,       m1.table_schema                 as "Schema"
,       m1.table_name                   as "Table"
,      case
           when m1.active_bytes >= power(2, 40) then to_char(round(m1.active_bytes / power(2, 40), 1)) || 'TB'
           when m1.active_bytes >= power(2, 30) then to_char(round(m1.active_bytes / power(2, 30), 1)) || 'GB'
           when m1.active_bytes >= power(2, 20) then to_char(round(m1.active_bytes / power(2, 20), 1)) || 'MB'
           when m1.active_bytes >= power(2, 10) then to_char(round(m1.active_bytes / power(2, 10), 1)) || 'K'
           else to_char(m1.active_bytes)
        end as "Bytes"
,       m2.table_catalog                as "Target Database"
,       m2.table_schema                 as "Schema"
,       m2.table_name                   as "Table"
,      case
           when m1.retained_for_clone_bytes >= power(2, 40) then to_char(round(m1.retained_for_clone_bytes / power(2, 40), 1)) || 'TB'
           when m1.retained_for_clone_bytes >= power(2, 30) then to_char(round(m1.retained_for_clone_bytes / power(2, 30), 1)) || 'GB'
           when m1.retained_for_clone_bytes >= power(2, 20) then to_char(round(m1.retained_for_clone_bytes / power(2, 20), 1)) || 'MB'
           when m1.retained_for_clone_bytes >= power(2, 10) then to_char(round(m1.retained_for_clone_bytes / power(2, 10), 1)) || 'K'
           else to_char(m1.retained_for_clone_bytes)
        end as "Clone Bytes"
,       datediff('days',m1.table_created, current_date()) as "Cloned Days Ago"
from snowflake.account_usage.table_storage_metrics m1
,    snowflake.account_usage.table_storage_metrics m2
where m1.id = m2.clone_group_id
and   m1.id <> m2.id
and   m1.retained_for_clone_bytes > 0
and   m1.table_catalog = 'SALES'
and   m1.deleted = FALSE
and   m2.deleted = FALSE;
To demonstrate the result of the above report, I executed the following SQL which cloned a 7.1GB table three times, and then dropped the original table.
create table SALES_BACKUP clone SALES;
create table SALES_BACKUP2 clone SALES;
create table SALES_BACKUP3 clone SALES;
drop table SALES;
The screen-shot below shows the resulting report. It shows the SALES table has zero active bytes indicating it was either dropped or the data deleted. However, it shows the three clone copies and the 7.1GB of data which is retained and therefore charged by the cloud service provider.

Be aware, Snowflake only holds one physical copy of the data, regardless of how many times the table was cloned. This means we are holding on to 7.1GB of storage not 21.3GB, and we’d need to drop all three clones to release the storage.
Summary
As a result of the move from on-premise databases to the cloud, storage costs have dropped dramatically, and currently cost between $23 and $40 per terabyte per month on most platforms. However, the ease with which we can (and indeed should) clone entire databases to support testing means we can quickly build up hundreds of terabytes of redundant storage. Provided the Snowflake administrators are aware of the underlying process we can quickly identify and remove this storage and potentially save huge sums.
Notice Anything Missing?
No annoying pop-ups or adverts. No bull, just facts, insights and opinions. Sign up below and I will ping you a mail when new content is available. I will never spam you or abuse your trust. Alternatively, you can leave a comment below.
Disclaimer: The opinions expressed on this site are entirely my own, and will not necessarily reflect those of my employer.

John A. Ryan